Showing posts with label Sewing. Show all posts

10 September 2011

Pretty Owl Dress with a flower

Lately, it feels like I am not doing anything else besides homeschooling and sewing.... believe me, that is not the case. There is something bigger in the picture that I don't want to reveal yet, but it has taken quite a bit of my time.

Nonetheless, I got inspired when I bought this cute owl fabric for another dress for my daughter. I did not use anyone's pattern, I came up with it all on my own. It's almost the same like the last dress.The top part came from a leftover fat quarter that I already had - and it fits perfectly with the owl colors. I remember a few mistakes I made with the other dress, especially the zipper part, so I changed a few things - and still I am not quite happy how it turned out... so there will be more dresses in the near (or far) future for her...

When browsing through other sewing blogs, I did see alot of flowers that seemed pretty easy to copy... and for this dress, it was almost a must. Jess from Craftiness is not optional posted a tutorial for flowers that I followed here. It is pretty easy, it took me maybe an hour and a half from start to finish - not too bad. It definitely adds to the dress. I will be making more of those as well...

But the best part of it all is that Peanut actually wore this dress already - so we got another home-run on wearing dresses - which makes Mami happy because I put alot of effort and time into those dresses.

Here is a picture with her wearing it before we headed to church for prayer meeting. She sat and read a book and was very unwilling to get up for me, so sorry that you don't get to see the full effect.

09 September 2011

Combined hobbies

Love is patient, love is kind. It does not envy, it does not boast, it is not proud...It always protects, always trusts, always hopes, always perseveres. Love never fails. (1 Corinthians 13:4)

This verse came in my daily verse email this morning. It's a great verse, and very true. So I thought I'd share my latest project in the sewing department...

A long time ago, I stitched this verse on a tiny 'blanket' and I always wanted to make a pillow out of it. So I finally got to work, chose the fabric that would go with the stitching, and sewed.....

I have some practice with pillows (see here), so it did not take me too long to finish the actual pillow. Also I decided against a zipper this time, but chose a pillow with an overlap in the back. Literally, it took me maybe 20 minutes to finish it - it was that easy.

Here is the finished product - it turned out pretty nicely, and will decorate our bed from now on (instead of hiding in the closet!).

Seriously, the overlap is so easy. Basically, I used half a yard of fabric, folded over and sewed the two shorter ends, and  then sewed the long ends together wrong sides together, with the overlap. That's it. Turn the pillow outside out, so the right side is on the outside - et voila.
Love is a word that we use alot, especially in America. To the German part in me, it's almost an overuse that takes away from the true meaning of the word. Love is a strong word that should not be spoken unless one means it - at least that's what I think.

On the other hand, the bible teaches us that we should love like God loves us, unconditionally, never-ending. And I agree. There is a difference between loving everybody, meaning not wishing them evil and treating them the way we want to be treated, and liking everyone - you definitely don't have to like everyone, or their actions.

I love how I have changed in the last few months, how the word love got a whole new meaning for me. It also seems to be the theme of our church, lately. What I see is love and understanding - we are not trying to 'fix' everyone. God made us humans all different - for a purpose. I believe that one of them is to learn to love one another, to respect and appreciate our differences. We can learn from each other, we can encourage each other, and we can give each other grace. The love that I show someone might make their day, or week, or change their life forever. It invites them to come and stay, which results in a feeling of belonging - and I believe deep down in all of us lays the longing for belonging. Everybody wants to be loved and eventually show love to others, and be a part of something - even as non-Christians.

02 September 2011

Finally a dress she likes

Recently, we went to a fabric store for some extra fabric that my friend C.Beth needed in order to make me a pocketbook just like hers....

A certain pattern must have caught my daughter's eye because she really insisted on wanting it. She was successful! Lucky Mami - the fabric was on sale, so I gave in and bought it for her. When I asked her what to do with it, she agreed to a dress.

Now if you know my daughter, she does not like to wear dresses, no skirts - but tutus. Go figure. And very unladylike when her favorite color is pink. Oh well. So far I have been successful in convincing her that the dress she is wearing is a 'really long shirt'. In any case, I put pants under dresses and skirts, so she is convinced she is wearing a shirt and pants....

Now that I bought and sewed her a dress from the pattern that she chose, she is happy to wear a dress! 

Here is my newest creation:
You won't see any detail shots of this dress... it's my first of this kind and it is NOT perfect. Because I figured it all out by myself, there are lots of mistakes. Mistakes I won't do again....
I already have a new fabric pattern that I had bought a while ago and it is waiting for me to try this kind of dress again - just better this time.

In the meantime, here is my little model - she loves it.

18 July 2011

A Boy for a King

I started a new project - something that was requested by my son.

He wanted a king's custome.

So I went online to look for a cape and pants and a shirt. It took me, surprisingly, a long time to find something that sounded easy enough to recreate and that I liked.
For the cape, I kind of followed THIS tutorial.

I think it turned out pretty good. He can use it both sides, in blue or in red. He loves it....

For the pants, I kind of followed THIS tutorial. I know I keep saying 'kind of' - I am just not that good in following all the directions - I want to add a personal note to the stuff that I am making.
And for the tunic, I used THIS. It was not as hard as I thought it would be. Actually, the shirt took me much less time than those pants.

I learned alot doing this costume. The cape was so easiest to do, for sure. It's just cutting the right lengths of the fabric and sewing it together, adding the ties in the process.
The pants took me a long time, but they are not that hard. I felt that the fabric, which is just plain solid cotton, was too thin. I mean these are play pants that will (hopefully) get a lot of usage, so I needed them a bit thicker. So I doubled the fabric. Actually, my thought was to make them in such a way that he could use either side, yellow or blue. But I just couldn't figure it out with the seems, so I gave up. It took me enough time to figure out the pattern in general.
The shirt was the hardest, especially because I jumped in the 'cold water' with the sleeves. I had never done sleeves before, but I thought a king's tunic without sleeves would just be 'royally' wrong.

The thing that I am most proud of is that I actually made my own bias tape this time, for the shirt's neckline and the sleeves. They sell bias makers in the store, but you can make it with your plain old iron at home. So that's what I did. It wasn't as hard as anticipated. I liked that it was not so thick to work with, because you know, you are working with alot of layers when using bias tape. It work out great.

And here is my happy model - he is excited that I finally finished it, because this was one of those projects that I kept procrastinating with for over a month.

07 July 2011

The second skirt one is done

Last week, I made a skirt for Peanut and I wrote a post about it here. Last night, I finally finished the second one that has the same fabric patterns, but opposite to the first one.

I have to say, and the Hubby agrees, that the second one turned out much nicer. See for yourself:
 It took me much longer than the anticipated 15 minutes from "To Sew With Love" - more like two hours. But I had so much fun, learned a lot and it looks great - I think.
 Peanut was in modeling mood this morning.... even though the skirt came off as soon as I put the camera down. At least she is smiling....
 Here are the two skirts next to each other...
And Peanut wanted to show off the first one as well....

Here is the original post from To Sew With Love again, for anyone who wants to try it out. She wrote an awesome tutorial, easy to follow, and easy to DIY (do-it-yourself).

04 July 2011

A Skirt for the Princess

I enjoyed a day off from my Mami-duties.... and sewed.
 I found this pattern while browsing through sewing blogs, This one is from this blogger - she is making a lot of awesome stuff, so I will be back there and copy some more....
 I even tried t o add two pockets, so it won't look to plain. I kind of like it....
Then I made my first button wholes, even though they are not for buttons, but I made them for the elastic. This way, it enables me to pull some out when she is still skinnier, and can release some (or even add some elastic) for when Peanut is bigger.
Peanut even modeled for me today...

I will make another skirt, with the same fabric, just opposite. Floral skirt with the green seam on the bottom. And I will try a bow this time as accessory.... 

UPDATE: I added a button to the pockets:
The site (To Sew With Love) where I got his cute and easy pattern from, hosts a blog hop. So I copied the list with the right tool, you should see a list below.I have not checked out each and every one, but most, and there are some real talented people out there! I love all their creativity. Awesome!

30 June 2011

Handmade Gift and an Art lesson

A little person will turn 4 this weekend, and she is very special to our family. This might be the last birthday to celebrate with her together because they are moving away, so I knew this gift had to be extra special. Besides a special toy and a store-bought dress, she is also getting my homemade skirt.


The idea came to me when I was shopping at Walmart and saw these - what they call Fat Squares.  I loved the concept of mixing different colors in one skirt or dress - back then I was not sure yet what I was going to sew.


I kind of came up with my own pattern - working along and seeing how it turned out - not loosing the plan of how I expected it to look. These colors are just perfect for the recipient - green and brown for nature, like Mother Earth. It fits her character and interests perfectly.

In the picture above you only see three different fabric patterns - I added one more later - an afternoon trip to Joann's.

I cut each fat square into four pieces of the same size - but then I only used two if each and then an extra one to make the right size for an four year old. The top part has an elastic band, so it will be more adjustable in case she gets a growth spurt. The ruffles on the bottom are made of the pattern that I added later.

Here is the final product:

I think it turned out beautiful. She likes tight skirts of dresses, so this one turned out just right for her. Lucky me, the elastic was not a problem at all, even though it took me a while to investigate how to make it. And I am so glad that the bottom part turned out as nice as it did. It sure took alot of time to figure it out - because you know how much I like to follow directions... NOT! So I sat there, researched the internet and tried and it worked the first time. I am very happy with it.

And I also have a close-up from all the colors - which I love by the way. I also learned something new about colors. I mean I already know that colors have to go together, compliment each other. There is also a meaning behind every color - did you know that?
Brown is warm neutral color that supposedly can stimulate the appetite and represents wholesomeness and steadfastness - a fact that I find very interesting. It is used to bring out other colors and their richness.
Now brown paired with green is very special on many levels. Dark brown can actually replace what black is so famous for: sophistication. Together with green, it can appear as very earthy, like recycling. But green means life - it's the spring color that tells all of our brains that the long winter is over and new life will come in the near future. Green stands for growth, health, renewal and revival. But it also stands for jealousy and inexperience - something that I read online but that is not what green means to me. What I learned about colors, especially colored rooms, is that green is a calming color - contrary to red that is suppose to be aggressive. Then I rather agree with the saying that green has both a warming and a cooling effect, so it is representing balance and stability - a perfect partner for brown that is steadfast.

Whatever it is, it looks great together - if I may say so myself - so lovely.

18 June 2011

Photo-On-Saturday

I will start something new...

I don't have alot of time on the weekend, at least not in order to spend it in front of the screen, aka computer. So I thought, why not just pick a picture of that day and post it for the weekend. And then I will see you all back on Monday.

So here is the first one:
Yes, I did more sewing, this time an apron out of a kitchen towel. It's super easy, lots of fun, and so not my idea. So here is the link to the original - I was just a copy cat.

16 June 2011

I can not stop

After making the dresses (here and here), I went back to making diapers.

Okay, I admit it, it was just two quick ones - really quick and really easy! You know why? Because I made my first doll diapers. Peanut is constantly using her big diapers on her Baby and Dolly, that I just had to make them for her. Here is a picture of her diapering her Baby:


So I went to the internet and actually found a pattern and directions for making your own doll diapers here.
It's super easy, took me maybe an hour, where I needed the longest time finding and choosing the leftover fabric from her diapers. I didn't want to use the more expensive fleece, so I just used cotton and such.

Here is the picture of the doll diapers on my doll that is now 35 years old!


13 June 2011

Another Dress

On my day off from all electronic devices, I made another dress. Well, kind of, anyways. I got the idea from another blog, of course.... here is her link, her stuff is amazing and so inspiring.
So I went to work yesterday, going through Peanut's clothes that I had put away already because they were too small. It seems that she didn't get to wear much of her 18-months clothes.... I found a t-shirt that was way too short, but not too small yet. It also had a stain on the tummy area - perfect to be cut and remodeled into a dress. So I cut it up a bit, made a skirt by scratch, even with pleas - can you tell that I am proud of myself!?! And then I sewed them both together, added a ribbon and voila:
 And here is my model, in a much happier mood today. She saw the shirt-dress this morning and actually wanted to wear it right away. So I let her, even though the skirt material was not washed yet... argh!

11 June 2011

More sewing - a dress this time

After making all those diapers, I needed something else..... so I made a dress for Peanut.


Amazingly, I made it in about two hours or less. When I saw the fabric, I knew what I wanted to do with it. I think it turned out really nice. I can't wait to make another one for her. 

Unfortunately, she wasn't in model mood today, so only a side shot, so you won't see her tears...


05 June 2011

Tutorial for sewing your own cloth diapers

This post is a work of progress, I've been wanting to put it up for such a long time. Now I finally finished it. This is a tutorial about sewing my own cloth diapers. This is what worked for me.

When I started to cloth diaper, I was able to borrow all the necessary diapers from my lovely neighbor. Her child had just potty trained, and the second one was not made yet ;) So I am thankful that I was able to try it out without any costs for me. It took some time to get used to it, when you come from the convenient way of diapering with very absorbent Huggies. But I loved the idea of being more environmental friendly - being green is the key! Eventually, I started buying some Fuzzy Bunz and loved them. Then when her baby number two was on the way, my neighbor needed her diapers back.

Once you started cloth diapers, it is hard to get back to the old wasteful way.... it is! So I figured (and had read on some blogs) that I could try to make my own diapers. I did some research and found some websites that provided a tutorial for making your own. The once that I did like were just way too complicated. When I found the right page, I printed the pattern, bought all the necessary materials, and started sewing. Then I tried it on, but it seemed way too big. I was a bit disappointed, to be honest. So I read some more and tried a few more diapers, until I came up with my own pattern.

Here is it in pictures:
After doing a few of those diapers, I have more like an assembly line now where I make a few diapers at the same time. It seems to go faster this way. I don't know why.

This is the pattern for a fitted diaper. You will need a cover for this.
So the fabric you need is the following:
   1 layer of flannel
   2 layers of anything you can find in your house, I use cotton alot
   1 layer of fleece

I did not go out buying all new, I used all old at first and only started buying later. I used old blankets out of fleece and old baby receiving blankets out of flannel.
The flannel is for the outer part, the cotton as soaking fabric for the inside, not visible after the diaper is all done, and the fleece for the part that touches baby's skin - the part that is the most sensitive. Fleece has the characteristic to let the fluid right through it without soaking it, so baby's skin is not sitting in wet cloth. 


This is my assembly line. I made five diapers at once, because I needed the room for our coming guests.
I cut all the fabric out first and then put them together, so I know if I have enough. I also tried to only use three layers of patterns but it seems to soak through too fast, so I still would use four.

In the middle of those four layers, you need to sew the soaker pad. The picture below shows that I make my own.


I use a few layers of leftover fabric, some cotton, some flannel and even fleece if I have it. Fleece seems to be the most expensive fabric, so I try to only use it for the inner part of the diaper where it touches baby's skin. 


I also bought wash gloves at Walmart, just simple, white ones. Adding to those wash gloves, I sew in a few pieces of my leftover fabric to make it a bit thicker in order to soak up the fluids.

I then sew the soaker on the inside layer of the diaper, so the stitches are not visible afterwards.Make sure it's right in the middle and more to the front than to the back.
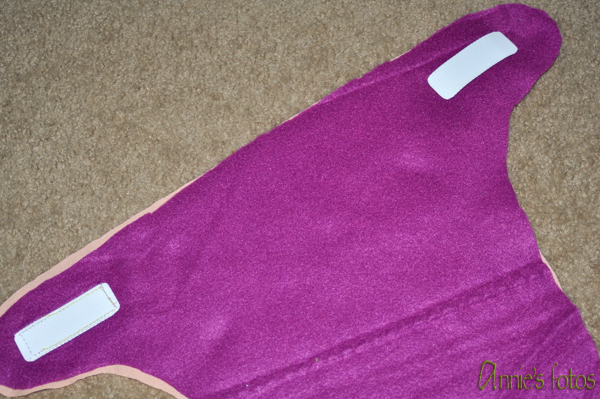
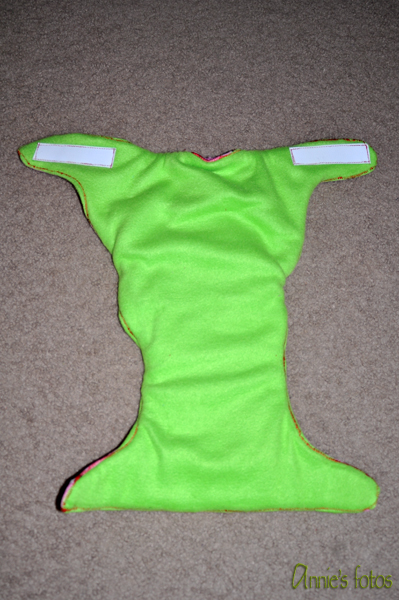
The next step is sew on the Velcro. I sew the Velcro loops onto the outer piece of the diaper, both outer layers by the way. It seems to work best for me. It is also easier to do this now, through only two layers, then later through four.

Hint: Buy Velcro that is not self-adhesive. My first diapers, I didn't know that they existed, so I used the ones with the sticky stuff on it and it ruined a few needles of mine. Bummer.


The Velcro hooks go on the two inner layers. Here I cut the edges away, so they won't hurt the baby. Once again, I had to make the experience of NOT using the sticky kind.... "Practice makes perfect."
The next step is to sew in the elastics. You cut two pieces of the same lengths, maybe four inches, that go along the seam on the legs. The other one go on the back part of the diaper, so it's a bit elastic in the back. You can cut it any size, I measure around three to four inches.
I try to stretch it out to where I want it to be and sew it to the diaper, to the two outer layers, a few times back and forth. You sew it with a very small straight stitch. In order to sew the elastic on, you need to hold it all stretched out, pulling it through the machine.
Do the same for both leg pieces and then the back part.
We are almost done, now we have to sew the four layers together. The way to do it, you take the two outer layers and the two inner layers and face them wrong sides to each other, so that the soaker part is visible. So the fleece and the flannel are touching each other and the two cotton pieces are outside.

Then you sew it together, leaving the entire bottom part, the part that goes on the belly, open. Sew it with a straight stitch all around the diaper.

Once that is done, you turn it right side out. Then you can fold down the front part of the diaper, and pin it, or not, and then sew it shut. 

The next step is optional, I don't do it, but I read about it. You could do a straight stitch next to the elastic on the legs and on the back, but I have never done it.

But what I do is a zigzag stitch around the part that gets touched the most, the front part with the Velcro loops. It gives it a stronger feeling, and on diapers where I hadn't done it, I sewed it on afterwards for a tougher hold.

This is how my very first diaper looked like. I still like it. You can see that I zigzagged all the way around the entire diaper, that is not necessary, and especially not on the leg part where it rubs baby's skin constantly.
These are my first five diapers. They are all a bit different in shape and size and stuff I did do and didn't do with them. Some I had to alternate after a few uses when I saw how it doesn't work, at least for me and my baby.
These are all my 17 diapers. I have finally found my own pattern and what works best for us. I use them every day. I love how they all have different colors and fabric. And my daughter has a few favorites of her own.

It is so much fun to make these.

A few hints for washing them: I use the same detergent I have been using since day one: Biokleen. It works great, it gets all the stains out and I love the smell... oh wait a minute, what stains and what smell??? Well, there is no smell to it, which means it is better for baby and environment. And stains? Well, one other great advantage of the fleece is that it doesn't get stained from Number Two! Believe me, she has done some not so pretty things, and it all comes out! Everything. I wash them in a cold cycle, like a prewash, and then a full cycle on warm, and then a rinse cycle, and it all comes out, there is no smell and there are no stains.

I love it.

05 February 2011

My very first sewn cloth diaper

The other night I was looking through Etsy - a place to buy and sell all things handmade, vintage, and supplies. Why? Well, Peanut is getting bigger, so my medium sized cloth diapers are getting too small. Also, my beloved neighbor has a growing baby and she wants to have her cloth diapers back. So I need diapers for her - at least for a little while longer until I am super serious with potty training. When looking through the multiple brand names, I always get stuck with the thought, why it is so damn (excuse me!) expensive?

So I found a few and then some more, cloth diapers that people have handmade. Then I saw tutorials to buy to make your own. Now that got me thinking! There must be free stuff out there! And there is.

So I educated myself (what a word!) and went shopping. Then I went through old clothes in our house.... and found what I needed. Within a week, I had all my supplies, patterns printed and even cut, and with two snow days, I made already two diapers. Here they are: 


At first the pattern looked way too big, but then I put it on her, and voila, it fits just fine. These are just cloth diapers, so a cover is needed.
How fun a snow day can be!!! And so productive. Now I have to make some more....

22 September 2010

My pillow collection

I mentioned yesterday that I had made several pillows for all the members of this family. So here they are, "my pride and joy".
For Coqui:

For Peanut:

And for the Hubby:

It took me a while to figure it all out, like the corners and the zippers, but I think for not having a layout and for doing it the first time, they turned out quite alright! The family loves them. The hubby sleeps with his every night. And the kids uses theirs during the day, to read or other stuff.